


Repair method and repair process of sliding bearing of high voltage motor
High-voltage motor sliding bearing repair method 1: recasting alloy repair method
1
✦
Preparation before casting alloy
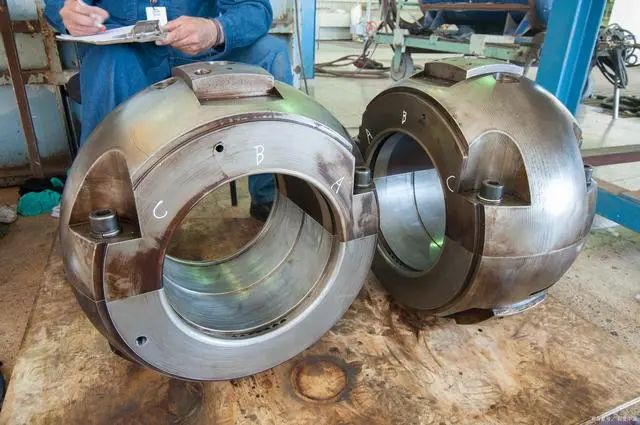
When the tile lining is seriously separated from the tile bottom, the alloy damage on the surface of the tile lining cannot be repaired by local repair welding, the wear of the bearing gap is too large, and the restoration of the gasket on the joint surface cannot be adjusted, and the alloy quality cannot guarantee the safe operation of the bearing. Consider recasting the alloy for repair. Generally, for bearings with circulating lubrication, the bearing radial clearance is 0.25% to 0.4% of the journal.
Melt away the old tile lining alloy and keep it well. Use a wire brush to remove oxides and dirt on the surface of the tile bottom, so that the surface of the tile bottom presents a metallic luster. Then use 10%~15% sulfuric acid solution to rust, and rinse it twice with hot water. At this time, carefully check whether there are cracks and other defects on the tile bottom. After passing the inspection, evenly coat a layer of zinc oxide solution on the casting surface of the tile bottom. Put it in an oven and heat it to 200°C~250°C. After taking it out, apply a layer of zinc oxide solution, and hang tin while coating. The thickness of the tin layer is 0.1-0.2mm, the thinner and more uniform the better. The surface of the tin layer should be bright, if there is a dark color, the tin layer needs to be hung again.
Silicon steel sheets or thin iron strips that are not bonded to the alloy are placed on the joint surface of the upper and lower tiles. The width should be such that the inner side can be in contact with the surface of the tile core, and the outer side should be aligned with the tile skin. When installing the tile core, keep the center of the tile core concentric with the center of the circle of the closed bearing bush. The notch of the oil pipe ring and the oil return hole should also be blocked with yellow mud. Finally, clamp the bearing bush tightly with a clamp.
According to the size of the bearing, select enough bearing alloy blocks and put them into the furnace for melting. The number of alloy blocks is essential to prevent rework caused by insufficient casting. The melting temperature of the alloy should not be too high or too low. If there is no measuring instrument, several layers of newspaper strips can be inserted into the molten alloy and taken out after 1-2 seconds. When the newspaper turns dark yellow, it means that the heating temperature of the bearing alloy is appropriate. If it appears black or yellow-black, the surface alloy temperature is too high. During the alloy melting process, the alloy solution should be continuously stirred with a dry wooden stick to make the alloy element components evenly distributed.
At the same time, preheat the clamped bearing bush, tile core and flat plate in an oven and keep it at 250°C, and it is not suitable to burn directly with fire. Put the preheated tile on the dry board and put the tile center upright. The outside of the tile is surrounded by molding sand.
2
✦
cast bearing alloy
Remove the slag from the molten alloy and inject it into the bore of the bearing bush. When one-third to two-thirds of it is injected, use an iron rod to quickly pound the unsolidified alloy solution in the tile to completely remove the gas inside the alloy. When casting alloys, if leakage is found, it should be quickly blocked with yellow mud.
In order to prevent the alloy from being oxidized during solidification, the surface of the alloy solution can be uniformly covered with hot charcoal to prolong the cooling time and prevent oxidation, so as to avoid the alloy becoming brittle and producing blisters after solidification.
In the process of casting the alloy, attention should be paid to controlling the temperature. When casting alloys, act quickly.
3
✦
Quality inspection after casting
After the bearing alloy is cast, the casting quality should be checked. The surface of the alloy after casting should be dark silver or silver yellow, without purple and dark yellow spots. The surface of the alloy should be free of blisters and cracks. There is no phenomenon that the alloy is detached from the tile bottom (it can be judged by the sound). The surface roughness of the alloy after casting is Ra 2.5 or Ra 12.5. When checking the gate section, there should be fine-grained crystal structure, and there should be no rough crystals
4
✦
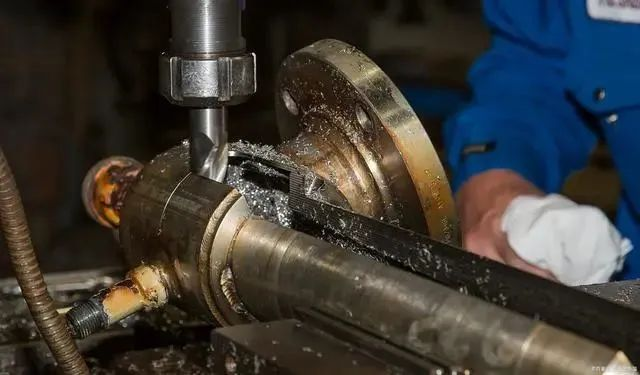
Bearing machining
The cast bearing bush that has passed the inspection should be repaired before lathe processing, so that the tile mouth and the split seam are aligned, and positioning pins should be driven in if there is one. In order to facilitate the adjustment of the bearing clearance in the future, 5-10 pieces of 0.02-0.05mm copper skin should be placed in the split. Finally, the dirt on the surface of the bearing bush is removed and machined on a lathe.
If the bearing bush is aligned accurately on the lathe and the processing size is reasonable, no scraping allowance can be left. After machining, it can be used directly after partial treatment by the fitter. At present, most domestic repair units still use the scraping and grinding bearing technology. After processing, in order to remove the tool marks and correct the geometric shape, it is necessary to scrape and grind, so a scraping allowance should be reserved during turning.
5
✦
Oil tank
When opening the oil groove, be careful not to open the oil groove at the stressed part of the lower bearing pad, and at the same time, the oil groove in the bearing pad cannot pass through the side of the bearing pad.
6
✦
Bearing scraping
The purpose of scraping and grinding is to form the correct geometric shape on the working surface of the tile lining. When the motor is running, the lubricating oil in the tile lining can build up a wedge-shaped oil film, so that the journal can run under the buoyancy of the oil film.
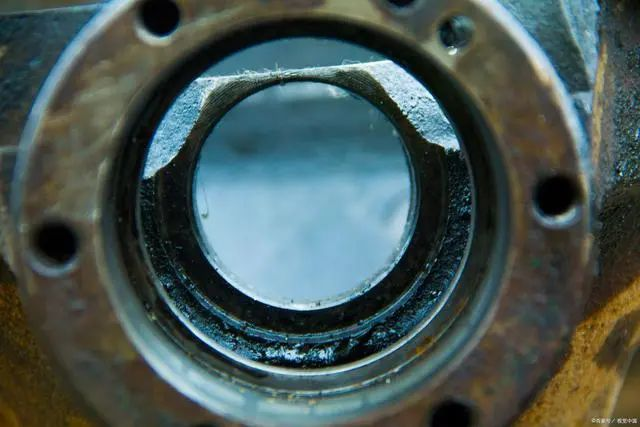
Bearing pad scraping is based on the journal, so it is necessary to check whether the journal is defective in advance, and the surface of the journal is required to be smooth and free of damage. When the micrometer checks the journal deviation and ellipse deviation, it should not exceed 0.025 ~ 0.035mm. If there is floating rust on the journal, polish it with fine sandpaper and wipe it clean with a clean rag.
The tile scraping tool must use a scraper, either a manual scraper or an electric scraper, but fine files and abrasive cloths are not allowed. A sharp scraper is required.
Put the lower bearing bush under the journal, and apply a thin layer of display agent on the journal (red lead powder for rough scraping, No. 22 turbine oil for fine grinding), and then crank to make the lining protrude Partially stick to the display agent, take out the lower tile, and use a scraper to gradually scrape off the protruding area where the display agent is stuck. According to the size of the protruding area, determine the strength of the scraper. The largest area should be scraped off completely. The medium area should only scrape a small piece of the middle raised part, and the small area can not be scraped first. Scrape in one direction first. Then scrape from the other direction, and the knife lines must intersect.
When scraping, the scraper should form an angle of 30° with the scraping surface, and scrape along the rounded corner (that is, the direction of shaft rotation) in sequence, without random scraping. In order to prevent the bearing bush from being scratched, only the knife lines form a network. Spots can be evenly distributed.
The above operation should be repeated several times, and finally fine grinding is carried out. At this time, no display agent is used, a little turbine oil is added, the lower shoe is placed under the journal, the rotor is rotated, and it is rotated forward and reverse 3-5 times. The height of the shaft should be small to prevent the shaft from bending. Generally, it can be lifted by 0.4-0.6mm. Take out the bearing bush, and determine the severity and direction of scraping with the scraper according to the uneven contact on the alloy surface of the bearing bush. Repeat the above operations until the bushing is in good contact with the journal. It is generally required that within a 60° (or 120°) arc, there should be more than two evenly distributed contact points per square centimeter of the lower tile. more than one touchpoint.
For motors above 600r/min, the contact angle between the bearing and the rotating shaft is 60°, and for larger motors with heavy loads, the contact angle is selected within the range of 90°-120°.
After the bearing bush is scraped and grinded, there is no obvious boundary between the contact part and the non-contact part of the bearing bush, and the surface of the bush should feel smooth without steps by hand.
After scraping the bearing bush, clean it with gasoline, and put it in the bearing seat and cover it with insulating paper or cloth to prevent dust from falling into it.
High-voltage motor sliding bearing repair method two: tile lining local repair welding repair method
1. The newly poured bearing bush is in good condition as a whole, but has local defects, such as air holes, trachoma, scars, etc.
2. The bushing has been worn out, or the geometric shape does not match, and the old bearing with local cracks and scars.
Restoration process:
①Cleaning of old bushing alloy
For partially damaged bushes that do not expose the bearing bush skin, use a scraper to clean the damaged alloy surface to expose the metallic luster. Then use a 10% alkali solution at a concentration of 70 to 100 degrees to wash for 5 to 10 minutes to degrease, and then wash away the residual alkali with hot water at 70 to 100 degrees.
For the bushes where the bearing bush skin has been exposed, first use a scraper or file to clean up the damaged parts of the alloy to reveal the metallic luster. You can also use the flame to melt off the alloy residue, and then use a wire brush to remove the dirt, rust, and alloy fragments on the surface of the bushing, especially the groove part should be carefully cleaned.
After cleaning, use 10%-15% hydrochloric acid or sulfuric acid solution to pickle and remove rust for 10-15 minutes, then use hot water at 70°C to 100°C to wash away the residual acid, and wash it with 10% alkali at 70-100°C The aqueous solution is degreased for about 10 minutes. Finally, wash away the residual alkali with 70℃~100℃ hot water.
② Preparation of flux and welding rod
The requirement for flux is that when welding, it can remove impurities on the surface of the alloy, protect its surface from the influence of the surrounding medium, and make the welding surface have good wettability. Secondly, during welding, the flux can precipitate tin components during the chemical reaction process, forming a 0.03-0.04mm tin-containing transition layer to ensure that the electrode droplet and the welding surface are firmly bonded together.
Commonly used flux formulations:
Zinc Oxide 50%
Ammonium Oxide 15%
Tin chloride or tin oxide 30%
Sodium Fluoride 5%
Mix the above-mentioned medicines in proportion and make a thin paste with water.
Alternatively, there is a flux recipe:
Zinc Oxide 10%
Tin protochloride 20%
Purified water 60%
The above three medicines are made into a solution. Ready to use with the distribution, can not be stored.
The electrode can be Babbitt alloy (or Wujin) electrode with the same or close composition as the basic metal, with a diameter of 5-10mm. The type of welding torch depends on the size of the bushing repair welding area, and the number 150 to 250 is generally used.
Repair welding process:
① Preheating
Use a neutral flame. The oxygen pressure is not greater than 0.29mpa, and the ratio of oxygen to acetylene gas is 1:3. It should be preheated evenly and slowly, so that the surface of the bushing is gray (about 200°C).
②Flux coating
Apply flux evenly on the surface to be repaired with a brush. It is advisable to heat it to white. At this time, it can be repaired. If the heating is gray, it indicates that the temperature is low and needs to be preheated again. If the flux rolls off in the form of balls on the surface of the repair welding, and the flux cannot be applied, it means that the surface temperature is too high.
③Welding
When welding, take left welding, and the electrode is 6-10mm away from the surface of the bushing, moving up and down. The burner is 5-10mm away from the surface of the bushing and the welding rod, and the burner should swing left and right to take care of the two rows of interfaces.
The sharp corners should be welded first, because the sharp corners are easy to overheat and produce air bubbles, which will affect the quality. Arc transition is required, and the flame should not heat the metal for a long time. After each welding, it can be welded continuously, but flux should be applied immediately to prevent hot cracks. Single-layer and multi-layer welding can be repaired. After each layer is welded, it should be cleaned with water and re-coated with flux. The width of the weld bead is 5-10mm, and the thickness is 2-3mm. The machining allowance for repair welding can be 2.5~3.5mm, and the scraping allowance is 0.1~0.5mm.
④ Points for attention in post-welding inspection and construction:
a. It is required that the grains of the alloy after welding are finer, and there is no dendrite produced by overheating.
b. No inclusions, bubbles, tiles and sharp corners, and the welding quality at both ends should be high.
c, no oxidation and overheating.
d. When welding, pay attention to the temperature not being too high or too low.
e. The flux is poisonous, so pay attention to ventilation during operation to prevent poisoning.
-End-
 XINDA
XINDA