Simple instructions for replacing carbon brushes of electric motors
Date:2023-10-14 Author:Shandong Xinda Motor Co., Ltd.
Simple instructions for replacing carbon brushes
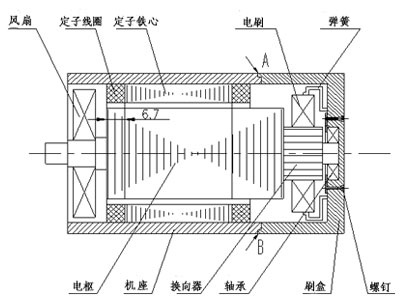
1. The simple schematic diagram of the motor is shown in the picture above.
2. To disassemble the machine, first remove the screws in the small holes on the back of the brush box. Then, remove the bolts connecting the machine base and the brush box, and tap A and B in the direction of the arrow with a mallet. , that is, apply even force on the circumference to disengage the brush box from the machine base and armature (when knocking, the fan should be prevented from moving in the direction of the stator coil, causing friction between the fan and the stator coil and damaging the stator coil. In addition, attention should be paid to maintaining The coaxiality between the brush box and the armature must be ensured to avoid damaging the bearings. If the bearings are damaged, the bearings should be replaced).
3. Replace the brush.
The replaced brush should have an arc consistent with the surface of the commutator. Otherwise, the brush should be ground to make full contact with the surface of the commutator.
4. When installing the machine, use the steps in the brush box to fix the spring (the spring is separated from the brush). The brush should be as outward as possible to ensure that the brush does not contact the commutator during assembly. Install the brush box and tighten the bolts (do not install the brush first). Tighten), adjust the circumferential position of the brush box to align the brush box with the engraved line on the machine base, and then tighten the bolts; then use the ventilation holes on the brush box to press all the springs against the brush. Finally, install the bolts on the back of the brush box and tighten them.
5. Inspection:
Stand the motor up, with the brush box down, and manually rotate the armature. The armature should rotate smoothly, and there should be no other noise except the sound of brush friction.





 XINDA
XINDA